Wednesday, December 28, 2011

This time it's Pottery!

So I'm finally getting around to updating the blog! This is the adventure of spinning pottery! (with so many pictures!)

This adventure started about a month or so ago. During a dinner conversation, my parent-in-laws mentioned how they wanted new coffee mugs from "a local artist." Of course my immediate reaction is "I bet I can make that." Some time passed and my wife(Oz) brings home a potters wheel and we get to work. Let me mention I have never worked clay on a wheel and the last time I even touched clay must have been 10 years ago at this point.

On the first day of attempts, I mangled some lumps of clay and tried to figure out centering. Nothing of mine survived the first day. Oz came away with a small bowl.

On the second and third day of pot throwing we were both much more successful!

We put handles on our mugs(called "pulling a handle") and then let all the clay dry for a few days. Once nearly all of the moisture has left the clay, it's ready to be fired in the kiln! After it comes out it becomes bisqueware.
The next step in the process is glazing. We took the simple route and just dipped the mugs and bowls into vats of glaze.
The next step is to put the glazed pottery back into the kiln to be fired again. One peculiar aspect of the glazes we were using is the appearance before and after firing. Take a look at all the before and after shots!


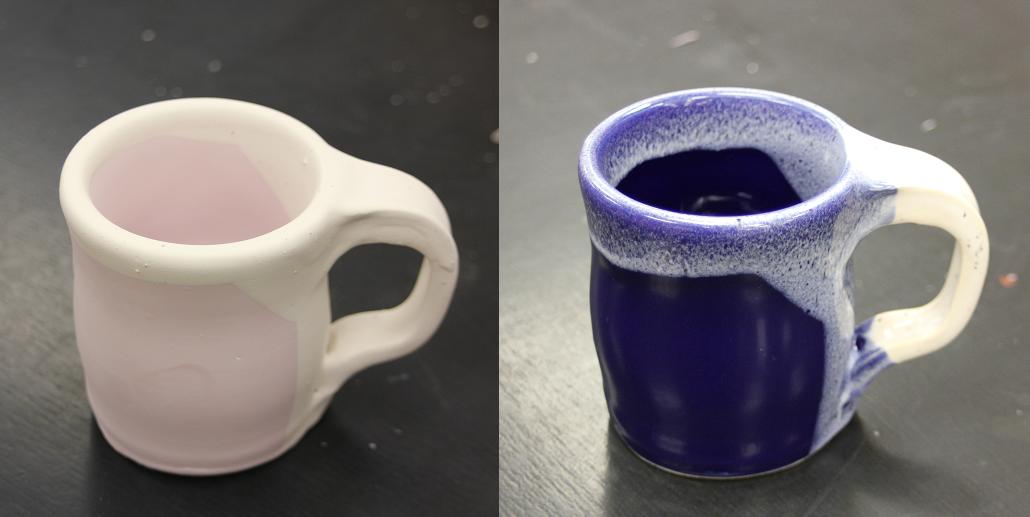
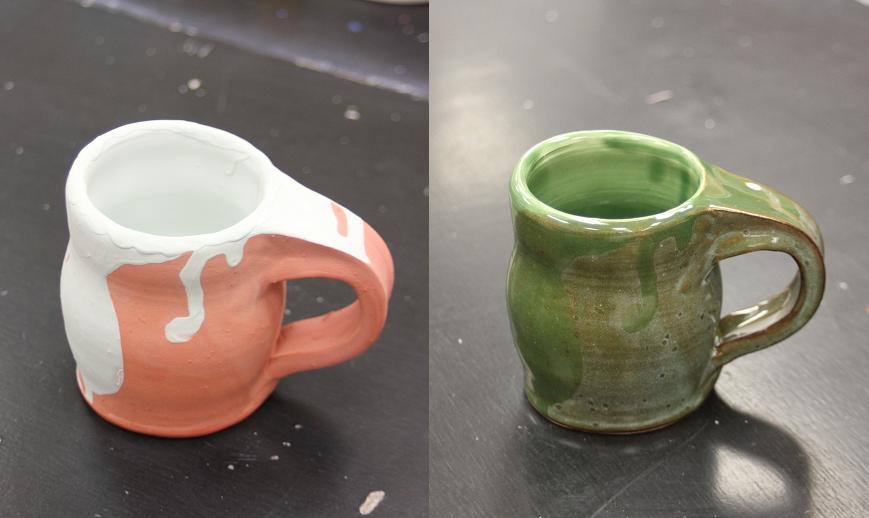
Oz's mugs and bowls:


I'm so glad everything survived two firings but turns out we made a lot of these too small. Unless you happen to prefer coffee and tea in amounts less than 8 oz. in which case you'd be set. Sadly using the wheel is a terrible mess and we'll have to wait til the spring to do more outside. For a first attempt I'm very pleased.

(I know I've forgotten to put up finished pictures of my violin but I'll put them up shortly and hopefully a video to go with it. It works but it's so very heavy!)

Tuesday, June 7, 2011

Quite a few things actually!

Oh my, I've been quite productive in the past two weeks. I even have pictures to prove it! Lots!

Last post, I mentioned drilling the holes for the tuners and for the audio jack. After that I lined up and glued the fingerboard to the neck of the violin. It was very worrisome because if it was misaligned I'd have a huge amount of work to fix it. Thankfully it went well.


The next steps were to level and align where the fingerboard and neck meet. This went pretty quickly and painlessly, I wasn't removing too much material. For the last bits of major body work, I dremeled out the tuning holes further to accept the top side piece of the tuners.


And I drilled and dremeled a hole for the endpin.


Once all of that was done I began sanding and sanding and sanding. First using 150 grit sandpaper, then up to 220 grit, then 600 grit, and finally I used 0000 steel wool. All went...... smoothly.

Next I measured and shaped the nut of the violin. When it was all ready I glued both the nut and the endpin into place.


Now, if I had wanted to I could have attached the rest of the pieces, done some wiring and stringed the violin but it still wasn't finished. I still had to seal the wood in some way. I've decided to use Tru-Oil, which is most often used to finish furniture and guns. While it sounds peculiar it is a very simple way compared to the industrial processes commercial instruments are finished with. It simply requires applying the finish by hand in multiple coats while letting each coat dry for about a day. I'm pretty sure I just put on the fourth coat this evening and I think I'll probably continue up to 6 coats. I may do a little more research to see what is a good number. Anyway it is looking stunning.


Oh what? Did you think I was done for this post? There's actually a little more! Long story short, I now have a banjo which was graciously given to me for free by a friend. The catch was that it was thoroughly busted. Here's the before(and slightly disassembled) picture: broken tuners, broken strings, generally dirty, and the removed backboard.


And here's the later(partly reassembled) picture: I replaced the tuners and strings, washed off the drum, and buffed the metal areas, fingerboard and neck. All back into working condition and staying in tune... except for the back board.

The backboard is a problem all on its own. It's made of plywood and sections began to separate. Also the finish was scratched and cracked. The separations were easily enough to correct with some wood glue and a hand full of clamps.


The finish on the other hand has been bothersome. I sanded it WAY down and have put a few layers back on. Here's where it's at so far, I still need to add a few more layers of finish, paint the edges black and smooth it out. But everything is coming along nicely and hopefully I'll have another post very shortly!

Tuesday, May 24, 2011

Slowly but surely

Still haven't forgotten about my projects. First and foremost is still my violin.

Since my last post I have worked on the large scale body work. I measured the size of the 1/4" audio jack and went about drilling and dremeling a hole in the underside of the violin. It's definitely not the nicest looking cut out but it'll be closed up, so I don't have to worry about the look of it. Once the hole was large enough for the jack to fit inside, I measured where the output hole would line up on the sidewall and drilled it out. I'm not quite sure what I'll put over the cutout but it'll probably just be a metal plate.


The next step was drilling out the holes for the tuners. I brought it in to work to use my company's drill press in the machine shop because this step is particularly important and should be as precise as possible. The holes need to be big enough to accommodate the tuning pegs but not too big as to cause the pegs to wobble and also the hole needs to be perpendicular to the backside of the headstock so that the tuners sit flush. In any regard, a hand drill and small selection of drills bits wouldn't be the best choice for these.

So, in our wonderful machine shop, I had access to the drill press which made this whole process very easy. The only draw back was that the machine shop has hundreds of drill bits with differences in the thousandths of an inch(.001). It was just a matter of starting small and working my way up to the proper size. I had already laid out where the tuning holes needed to be and simply lined things up to drill.


In the lower picture, if you look closely, you'll see that the tuners aren't screwed in permanently. Yet in the upper picture, the violin is turned over and the tuners didn't fall out! I think this shows I've done it right, at least gravity alone can't pull them out.

Now that those things are done, I've got a lot of sanding to do, a bit of neck work to finish, and then a bit of gluing. Hopefully this will be done sooner rather than later!

Wednesday, April 13, 2011

Stop Violin, Go Game Board

So if slow and steady wins the race it should be obvious my violin project is running a marathon. I've only done one pass of sanding with 150 grit sand paper in the past few weeks but I was stuck deciding on what to do next. I didn't want to keep sanding while I still had large scale body work to do(cutting a recess for the electronics and drilling tuner holes). But I've finally decided I'm only including a piezo pickup and 1/4" audio jack in the body and putting the rest of the electronics in a separate swappable box.

In other "I can make that" news, two weekends ago a friend mentioned a board game called Go to me in passing. It's a Chinese/Japanese/Korean game about controlling territories on a board by placing black or white stones at intersections and surrounding your opponent. I have enjoyed playing it. And of course rather than buying a board I felt I could totally make that. This past weekend, that's what I did.


I decided since I'm a beginner I'd make a smaller board. The official size is a grid of 19x19 but the strategy is a little rough to comprehend when you begin playing. So beginners start on a board of 9x9 to get a better understanding of how the plays interact.


Once they get a handle on defense/offense and capturing territory, the players move up to a 13x13 board. Which is what I made on the reverse side of the board!


Overall this was a very simple project. I got some plywood from Lowe's and cut it down to size. Which is calculated by:
((GridSize-1) x Box width) + (2 x border width)
For whatever reason the boxes are 22mm in width but 23.7 mm in length and I arbitrarily decided 15mm for a border. Then I gave all the sides a quick sanding. After that, I painted a thin layer of clear coat to seal the wood. Then marked out the grid lines in pencil and went over them with a normal black sharpie marker. Lastly I painted two more clear coats on each side and it was done! I bought an inexpensive set of black and white stones from Amazon and now I'm ready to play!

I'll be getting back to the violin very soon

Thursday, March 10, 2011

Progress via image dump

So it's been a long, slow month since the last update. Since then I've done lots and lots of work on my violin... except it's not as significant a jump as the last time. There's been plenty of rasping, filing, and sanding to trim down and level out the body. Hours upon hours of slow removing wood. Here's a photo dump of some of the progress that's taken place.

First, a quick look at my workshop aka a small bench and chair, with giant piles of sawdust below. Literally inches of shavings.

Next, we have some closeups. Everything's getting smoothed, flattened, shaped and thinned.


I really like the grain at the end here.

And lastly, photographic proof that it's REALLY flat. Even the edges have a nice line to them. Sadly, you can still see the remnants of the biggest gouge I made while using the planer. But it's nearly gone and it will be underneath the tail piece once everything is finished.... so I'm not sure how much more time I'll sink trying to get rid of it.

Things to come: Sanding sanding and more sanding. Drilling holes for the tuners. Drilling out a space for the electronics and audio jack. Fitting the fingerboard and nut. Finishing the wood.

Monday, February 14, 2011

More work on my violin

It has been quite a long time since I've properly worked on my violin. About 9 months actually. Just for reference here is where I left off...


There are very few redeeming qualities of the violin above. You can see in grand generalities that something could be made from this hunk of wood. But the generous amount of time it took to just get it looking like this was disheartening. I will warn anyone, bloodwood is an awful wood to work with. Yet I had gotten this far with it, I feel this needs to be finished.

So over the past week I've spent a lot more time working on it. It's still no where near finished but now it is finally looking attractive. I've spent some time shaping the headstock into it's final form, though it's still too thick to fit the tuners in properly. I've also shaped the lines of the neck and body, however they still aren't quite in line and need to be reduced further. Also the picture below isn't the most recent representation, I took this picture Saturday night and I spent a few more hours on Sunday shaping the bumps to either side. I haven't finished those parts yet but they are looking much more pleasing to the eyes. Still plenty of work to do but it is definitely more enjoyable to work on something when you can see the benefits.


Expect to see more in the near future as I keep working on this.

Wednesday, February 9, 2011

Pictures posted!

So seemingly I can manage to go three weeks without posting pictures, but I can also remember the other thing I wanted to post.

Leading up to the end of December, Oz had decided her final project for the metal working class she was taking was going to be a hand sculpture of some sort. One aspect she wanted it to have was that it would have LEDs light up when the wearer touched another person. My job was to figure out the circuitry and make it work. First I found a circuit schematic that gave me a good idea of what parts I would need: a power source, a transistor, a resistor and an LED. Then after further research I found that two transistors in a "Darlington Pair" configuration would make the circuit work better. Below is the simplest circuit working off a set of watch batteries.


Then I added a few more LEDs to the circuit and switched to a 9volt battery power source.


Once Oz made the center piece for all the final circuitry I went about installing the circuitry in a manner I assumed would work. This included two transistors in the Darlington Pair setup, 14 total LEDs and several resistors. And all done free hand without a PC board to solder the parts to!


The final piece working! The 9volt battery supplied power to the whole thing, the thumb was the Hot lead and all the other fingers were the cold leads. So if you made contact with the thumb and any finger through skin the LEDs would light up!


Also another note is that I started working on my violin again. Last night I setup a work space and cut the shape of the headstock. Still lots of work to do on it though. It'd be much easier if I had the proper tools for the job but the proper tools are all big machines that are quite expensive. I'll make do with what I have instead.

Thursday, January 13, 2011

And Two and a Half Months later...

Turns out I can manage to get things done but then never bother to post the outcome. And as I have a better habit of posting pictures after I write something here's what I've got.

The arcade controller came out very nicely if I do say so myself. After my post in November it took about 2 weeks to put it all together but not without some anguish. The first problem I came across was from the aspen(?) board I chose for the top panel. After deciding on the button and joystick layout, I started drilling and happened to tear out a huge chunk of board between two buttons. Since those two buttons were the FIRST two buttons I drilled, I assumed the wood was too soft and not up to the challenge of being an arcade panel.

The next board was MDF, a glued, compressed saw dust type board. This worked perfectly. All the holes were drilled out, I routed out the underside of the panel, I cut the side boards to size, screwed them all together. Then Ta-Da I had a wooden box with a lot of holes in it.


After that came painting, I sprayed two layers of gray primer then 3 layers of black glossy. The black didn't come out the way I wanted it to, so I hand painted a heavy layer of clear coat. That result was far more appealing!


The next to last step was adding all the buttons and joysticks. One or two joysticks needed a few spacers for leveling but that was real easy. (This is the prettiest picture)


And LASTLY, I hard soldered all the wires to the buttons and connected them to the control board. I didn't get good results with the quick disconnects I had used on the earlier test model.


Also, at some point during a clean up day, I threw out the wire that connected the control board to the computer. It was a very weird male PS/2 plug(that mice and keyboards are connected with) to a male USB wire. So since I didn't have the time to have a new wire shipped to me I had to make my own. After a good deal of research and stripping wires down, I ended up with the wire below. Thankfully it worked!


And that's everything for the arcade controller. I had friends over and it works great!